Potatoes are one of the most rewarding crops for home gardeners, offering flexibility in how they can be grown. Whether working with a large backyard garden or a small balcony, gardeners can successfully grow potatoes either in the ground or in containers. Both methods produce healthy potato crops when gardeners understand the basic requirements of proper soil preparation, consistent watering, and the essential technique of hilling.
Container growing offers distinct advantages for those with limited space or poor soil conditions. Containers protect potatoes from pests like voles and wireworms while giving gardeners better control over drainage and soil quality. Ground planting works well for those with garden space and can accommodate larger plantings. The choice between methods depends on available space, soil quality, and personal preference.
This guide covers everything needed to grow potatoes successfully using either method. From selecting the right varieties and preparing seed potatoes to mastering hilling techniques and knowing when to harvest, these straightforward steps help gardeners produce a satisfying potato crop in any setting.
Key Takeaways
- Potatoes can be grown successfully in containers or in the ground with proper soil preparation and regular watering
- The hilling technique of gradually adding soil around growing plants is essential for preventing green potatoes and maximizing yields
- Harvest timing ranges from 90 to 120 days after planting, with new potatoes ready after flowering and full-sized potatoes harvested when plants die back
Understanding Potato Growing Methods
Gardeners can choose between two main approaches for growing potatoes: planting them directly in the ground or using containers. Each method offers distinct benefits and challenges that affect yield, space requirements, and maintenance.
Potatoes in the Ground vs. Containers
In-ground potato growing involves planting seed potatoes in garden beds or rows. This traditional method requires tilling or loosening soil to a depth of 8-12 inches. Gardeners plant seed potatoes 12 inches apart in trenches about 4 inches deep, then cover them with soil.
Container potato growing uses pots, grow bags, or buckets instead of garden beds. Containers need to be at least 12 inches deep and wide, with drainage holes at the bottom. Gardeners fill containers partway with soil, plant seed potatoes, then add more soil as plants grow.
The main difference lies in space flexibility. Ground planting works best for those with yard space and the ability to prepare soil beds. Containers suit balconies, patios, or small yards where ground space is limited.
Advantages and Drawbacks of Each Method
Ground Growing Benefits:
- Higher yields per plant with unlimited root space
- Lower setup costs with no containers to purchase
- Natural soil drainage and temperature regulation
- Easier to grow large quantities
Ground Growing Drawbacks:
- Requires yard space and soil preparation
- More difficult to control soil quality
- Harder to harvest without damaging tubers
- Vulnerable to soil-borne pests and diseases
Container Growing Benefits:
- Perfect for small spaces like patios
- Complete control over soil mix and quality
- Simple harvest by dumping containers
- Easy to move for optimal sun exposure
Container Growing Drawbacks:
- Requires frequent watering and monitoring
- Lower yields compared to ground planting
- Initial cost for containers and potting soil
- Containers need adequate drainage to prevent rot
Selecting Potato Varieties for Success
Over 200 potato varieties exist, each with different growing times, sizes, and uses. The best choice depends on growing space, climate, and how the potatoes will be used in the kitchen.
Best Potato Varieties for Containers
Determinate varieties work best for container growing because they form tubers in a single layer near the seed potato. These compact plants don't require hilling and mature faster than indeterminate types.
Yukon Gold stands out as a top container choice with its golden skin and creamy yellow flesh. This determinate variety matures in 95-110 days and produces smooth, round tubers. It needs consistent watering to prevent hollow heart development.
Norland Red and Dark Red Norland mature quickly in 70-90 days. These determinate varieties produce red-skinned potatoes with white flesh and work well in smaller containers.
Purple Viking offers visual appeal with deep purple skin splashed with pink and white flesh inside. It bulks up fast and sells out quickly at seed suppliers.
Fingerling varieties like French Fingerling grow well in deeper containers. These indeterminate plants benefit from adding soil as they grow, which increases yield in containers at least 18 inches deep.
Early, Mid-Season, and Late Varieties
Early season potatoes mature in 60-80 days, making them ideal for gardeners who want quick harvests. Norland Red and Irish Cobbler fall into this category. These determinate plants produce smaller tubers with thin skins perfect for spring harvests.
Mid-season varieties take 80-100 days to mature. Yukon Gold and Russet Norkotah belong to this group. They offer a balance between quick harvests and good yields. Most mid-season potatoes are determinate and don't benefit from hilling.
Late-season varieties need 100+ days to reach full maturity. German Butterball produces buttery-flavored tubers and resists late blight and common scab. Magic Molly fingerlings have dark purple flesh rich in antioxidants. These indeterminate plants keep forming tubers throughout the season when hilled properly.
Late varieties store better through winter because they resist sprouting and shriveling. Early varieties work best as "new potatoes" eaten fresh.
Choosing Between Certified Seed and Grocery Store Potatoes
Certified seed potatoes come from inspected crops free of diseases like late blight, blackleg, and potato viruses. These seed potatoes provide the best chance for healthy plants and good yields.
Grocery store potatoes often receive treatment to prevent sprouting during storage. This treatment can slow or stop growth when planted. Store-bought potatoes may also carry diseases that spread to soil and future crops.
For container growing with fresh potting mix, the disease risk drops compared to garden soil planting. However, certified seed potatoes still perform better. They're selected for strong sprouting and disease resistance.
Local garden centers and online suppliers sell certified seed potatoes. Gardeners should check with local extension offices about any restrictions on moving seed potatoes between states. First-time growers especially benefit from starting with certified seed potatoes to avoid early frustrations with poor germination or diseased plants.
Preparing for Planting
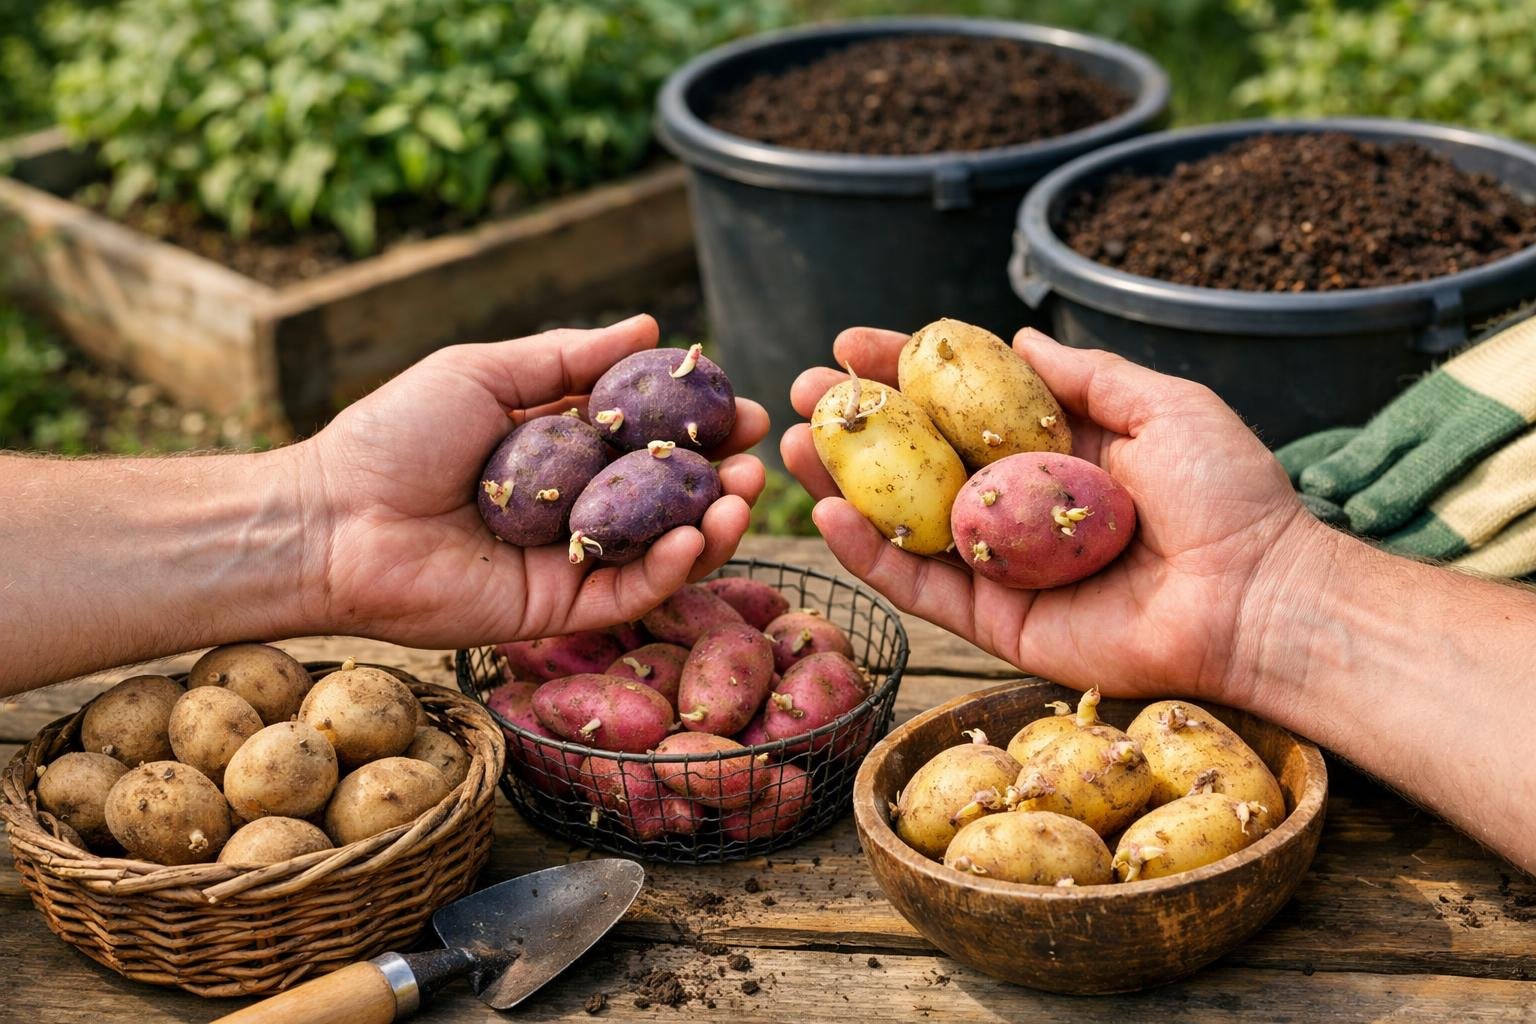
Getting seed potatoes ready before planting involves two main steps: cutting larger potatoes into proper-sized pieces and encouraging them to sprout early. These preparation methods help ensure stronger plants and better harvests.
Preparing Seed Potatoes and Cutting Seed Pieces
Seed potatoes should be examined for small indentations called eyes, which are where sprouts emerge. The area with the most concentrated eyes is called the rose end.
Small seed potatoes can be planted whole without cutting. Larger seed potatoes should be cut into pieces to create more plantings, but only when necessary.
When cutting seed potatoes:
- Each piece needs at least one or two healthy eyes
- Use a clean, sharp knife to prevent disease
- Cut larger potatoes in half or into sections based on size and eye distribution
- Allow cut pieces to dry for at least several days before planting
The cut surfaces must form a protective layer. This drying period of one week or more lets the exposed flesh scab over and prevents rot when planted in soil. Fresh cuts placed directly in the ground often lead to bacterial problems and failed growth.
Chitting and Pre-Sprouting Techniques
Chitting gives seed potatoes a head start and produces more potatoes at harvest. This process takes four to six weeks before the planned planting date.
Start by placing seed potatoes in a warm, dark spot around 70 degrees for one to two weeks. This breaks their dormancy and signals them to begin growing.
After this initial period, move them to a cooler area with bright indirect light. A shelf near a window works well. Position each potato with the rose end facing up so the most productive eyes receive light exposure.
The potatoes will develop short, sturdy sprouts in the light. These sprouts should be thick and purple or green, not the long white sprouts that form in dark storage. Once sprouted, the seed potatoes are ready to plant in soil or containers.
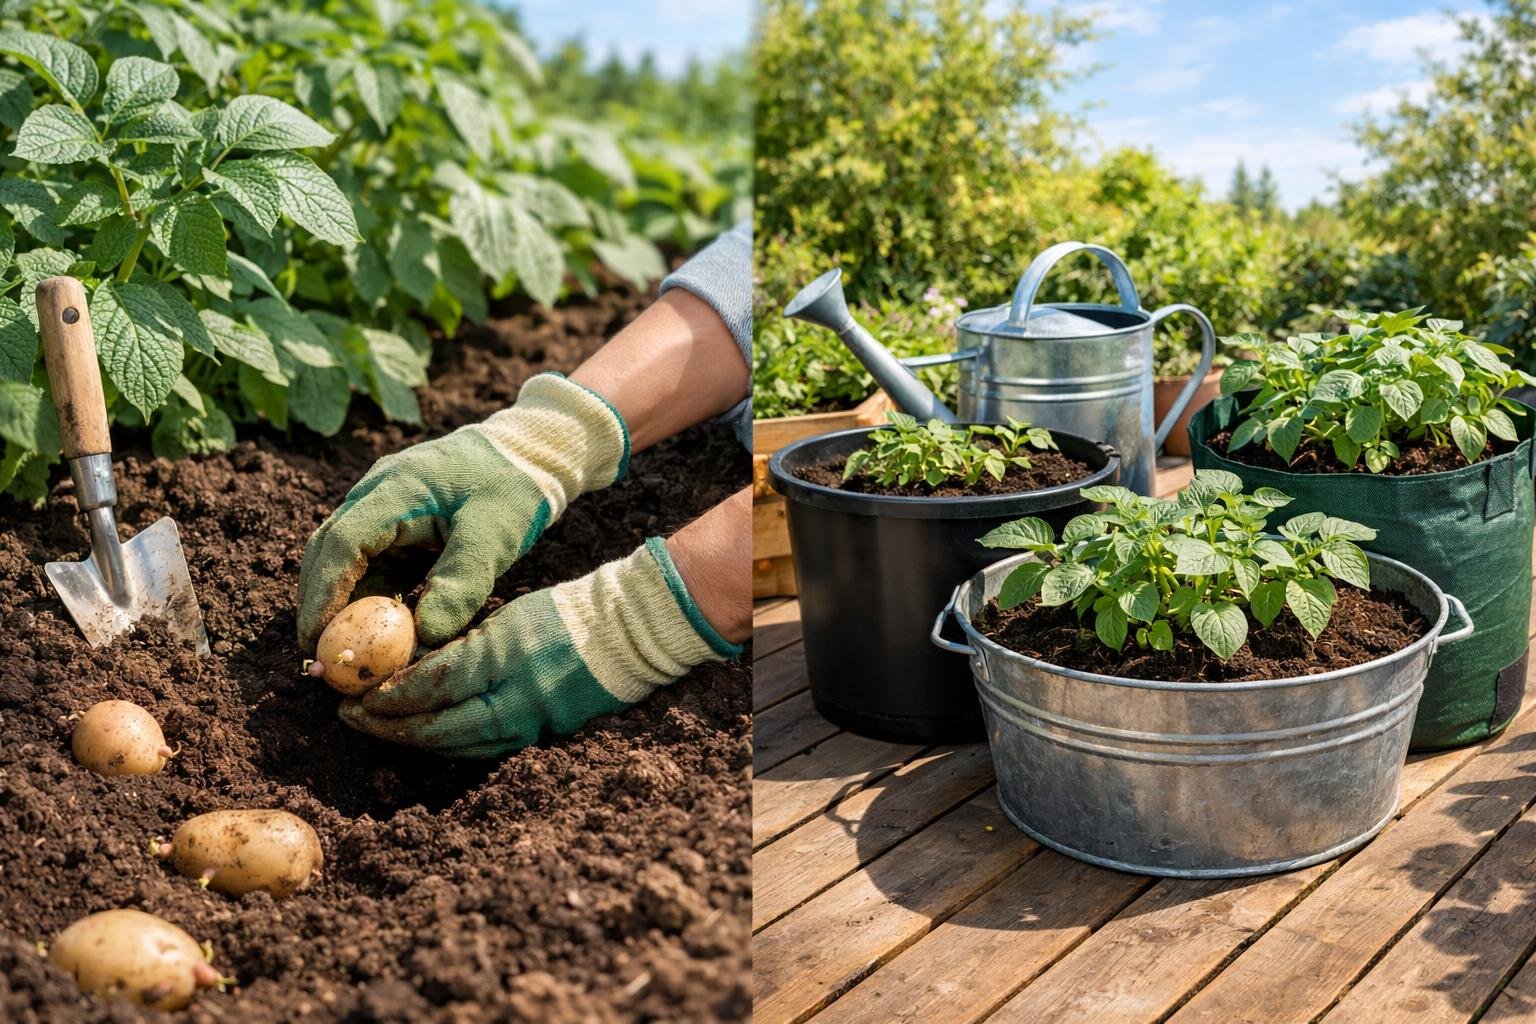
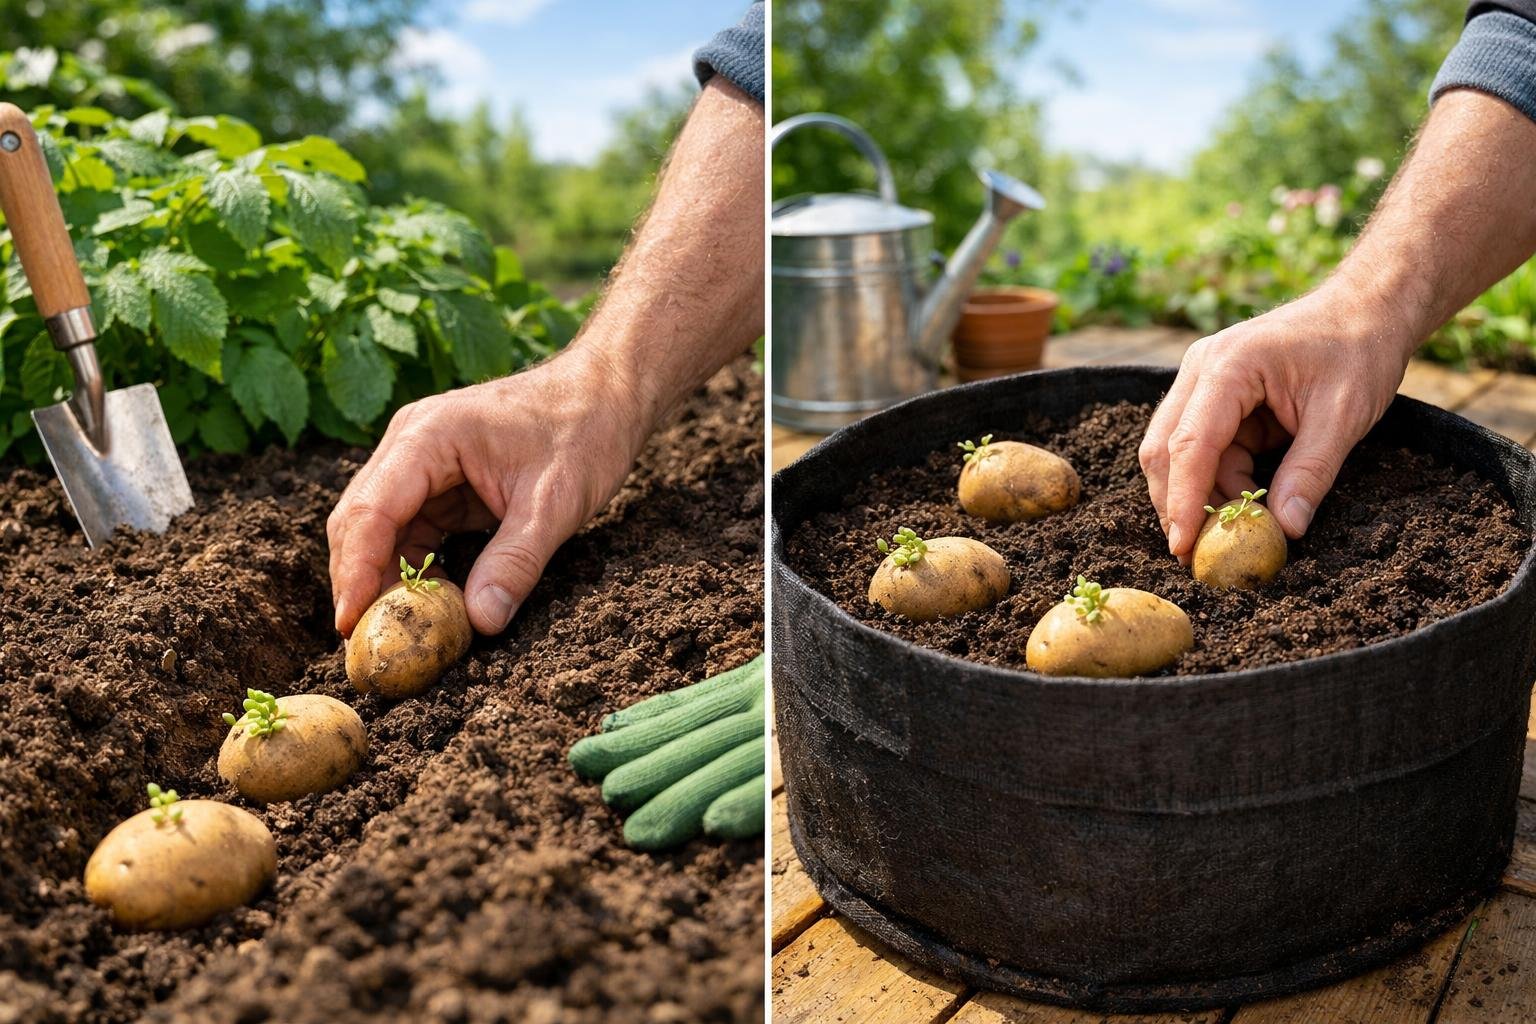
Choosing and Setting Up Containers
Container selection and proper setup determine how well potato plants develop their tuber crops. The right container size, material, and soil preparation create the foundation for healthy growth and good yields.
Selecting the Right Container or Grow Bag
Each potato plant needs approximately 2.5 gallons of growing space to produce a decent harvest. A 10-gallon container can hold about 4 potato plants, while a 5-gallon pot works well for 2 plants.
Container options include:
- Fabric grow bags - Breathable material prevents waterlogging and promotes healthy root growth
- Plastic pots - Affordable and reusable but require adequate drainage holes
- 5-gallon buckets - Common household items that work perfectly when modified with drainage
- Storage tubs - Large and shallow, suitable for multiple plants
- Trash cans - Ideal for vertical growing with deep soil layers
The container must be at least 12-16 inches deep to accommodate potato growth below the soil surface. Drainage holes are essential, as standing water causes tubers to rot. Food-safe materials matter when growing edibles, so avoid containers that previously held chemicals or non-food products.
Dark-colored containers heat up faster in direct sunlight, which can stress plants. Light-colored or reflective containers maintain cooler soil temperatures during hot weather.
Preparing Potting Mix and Drainage
Potatoes in pots require loose, well-draining soil that allows tubers to expand easily. Garden soil becomes too compacted in containers and restricts growth.
A quality potting mix should contain equal parts peat moss or coir, compost, and perlite or vermiculite. This combination provides nutrients, retains moisture without becoming waterlogged, and offers the loose texture potatoes need.
Add a 2-3 inch layer of gravel, stones, or broken pottery pieces at the container bottom. This drainage layer prevents soil from blocking holes and keeps excess water flowing out. Some growers place landscape fabric over the drainage material to separate it from the soil layer.
The soil pH should range between 5.0 and 6.5 for optimal potato growth. Mix in aged compost or a balanced fertilizer before planting to provide initial nutrients. Fill containers only 4-6 inches deep initially, as gardeners will add more soil as plants grow through a process called hilling.
How to Plant Potatoes in the Ground or Containers
Proper planting depth and spacing determine how many potatoes each plant produces, while soil preparation affects tuber size and quality. These factors work the same whether planting in garden beds or containers.
Planting Depth, Spacing, and Placement
Plant seed potatoes 3 to 4 inches deep in the ground or in containers. This depth protects the developing tubers from sun exposure while keeping them close enough to the surface for shoots to emerge quickly.
Space seed potatoes 12 inches apart in garden rows, with 24 to 36 inches between rows. In containers, place seed potatoes 5 to 6 inches apart with eyes facing up. A 15-gallon container comfortably holds 3 to 4 seed potatoes.
When to plant potatoes depends on local frost dates. Plant 2 to 4 weeks before the last spring frost when soil temperatures reach 45°F. When to plant potatoes in containers follows the same timing, though containers warm faster than ground soil in early spring.
Position containers in a sunny location before filling them with soil. A 15-gallon container filled with moist potting mix becomes too heavy to move easily. Leave 8 to 10 inches of headroom above the planted seed potatoes to allow space for hilling as plants grow.
Soil Preparation and Amendments
Garden soil should be loose and well-draining with a pH between 5.0 and 6.5. Work 2 to 3 inches of compost into the planting area before planting. Avoid adding fresh manure, which can cause scab disease on potato skins.
Container growers must never use garden soil, which compacts and blocks drainage. Mix equal parts soilless potting mix and well-rotted compost instead. This combination provides structure, drainage, and fertility without becoming waterlogged.
Skip high-nitrogen fertilizers at planting time. Excess nitrogen produces leafy growth instead of tubers. A balanced fertilizer worked into the soil before planting provides enough nutrients for early growth. Additional feeding comes later through hilling with compost-enriched soil.
Essential Potato Plant Care
Proper watering and feeding make the difference between a weak potato crop and a strong harvest. Plants need steady moisture without waterlogged soil, and they require specific nutrients at different growth stages.
Watering and Moisture Management
Potatoes need consistent moisture throughout their growing season. The soil should stay evenly moist but never soggy or waterlogged. Overwatering causes the tubers to rot, while underwatering leads to small, underdeveloped potatoes.
Gardeners should water deeply and allow the top 1-2 inches of soil to dry out between watering sessions. Container potatoes dry out faster than in-ground plantings, so those who grow potatoes in pots need to check moisture levels more frequently. A finger test works well to determine if watering is needed.
During tuber formation, which happens when plants begin flowering, consistent moisture becomes especially important. Irregular watering during this period can cause cracked or misshapen potatoes. Stop watering 2-3 weeks before harvest to allow the potato skins to toughen up for better storage.
Drip irrigation systems work well for both ground and container growing. They deliver steady moisture directly to the root zone and reduce water waste.
Fertilizing and Feeding Requirements
Potatoes are moderate feeders that benefit from nutrient-rich soil. They perform best with plenty of organic matter but can suffer when given too much nitrogen. Excessive nitrogen produces large, leafy tops with small tubers underneath.
At planting time, gardeners should mix compost into the soil. This provides a steady release of balanced nutrients. When hilling potatoes every few weeks, adding fresh compost with each layer supplies ongoing nutrition as plants grow.
A dilute seaweed extract or compost tea applied once or twice mid-season supports healthy growth. Avoid high-nitrogen fertilizers like those formulated for leafy greens. Instead, choose balanced organic fertilizers or those designed for root crops.
Container-grown potatoes benefit from the fresh soil and compost added during hilling. Those reusing containers and soil should amend with balanced organic fertilizer before the next planting.
Key Techniques: Hilling and Container Maintenance
Hilling potatoes promotes more tuber production and prevents greening, while container-grown potatoes need specific care to thrive in limited soil space. Regular watering and proper fertilization keep plants healthy throughout the growing season.
How and When to Hill Potatoes
Hilling involves mounding soil around the base of potato plants as they grow. This technique encourages plants to produce more tubers along the buried stem. It also protects developing potatoes from sunlight, which can turn them green and toxic.
Gardeners should start hilling when plants reach 6 to 8 inches tall. They need to mound soil, straw, or compost around the stems, leaving only the top few inches of foliage exposed. This process should repeat every 2 to 3 weeks as plants continue growing.
In containers, the hilling process works differently. Gardeners start with 4 to 6 inches of soil at the bottom and plant seed potatoes. As shoots emerge and grow, they add more potting mix in layers. Each layer should be 2 to 4 inches deep.
The hilling process typically happens 3 to 4 times during the growing season. Plants need at least 4 inches of foliage above the soil line at all times to photosynthesize properly.
Ongoing Container Care for Healthy Growth
Container potatoes need consistent moisture because soil in pots dries faster than ground soil. The soil should stay evenly moist but not waterlogged. Daily watering may be necessary during hot weather.
Drainage is critical for container success. Pots must have adequate drainage holes to prevent root rot. Gardeners should check that water flows freely from the bottom after watering.
Fertilization supports heavy feeding requirements. A balanced fertilizer applied every 2 to 3 weeks helps plants produce quality tubers. Organic options like compost tea or fish emulsion work well.
Light requirements stay the same as ground-grown potatoes. Containers need placement in areas receiving 6 to 8 hours of direct sunlight daily. Plants may need rotating if sunlight is uneven.
When and How to Harvest Your Potatoes
Potatoes are ready to harvest between 60 and 130 days after planting, depending on the variety and whether you want baby potatoes or mature storage potatoes. The harvest process is straightforward whether you've grown potatoes in the ground or in containers.
Signs of Maturity and Harvest Timing
Early season potatoes mature in 60-80 days and are ready when the plants begin to yellow. These thin-skinned potatoes store for only about 3 weeks.
Mid-season varieties take 80-100 days and can be stored for up to a month. Late-season potatoes need 100-130 days to mature and store for 2-3 months.
The most reliable sign of readiness is the plant's appearance. When the foliage starts to yellow and wilt, stop watering and wait one to two weeks. For baby potatoes, harvest two to three weeks after flowering. For mature storage potatoes, wait until two to three weeks after the foliage has completely died back.
To test readiness, dig up one plant and rub a potato with your thumb. If the skin easily rubs off, the potatoes need more time to develop thicker skins for better storage.
Harvesting Potatoes from Containers and the Ground
For container-grown potatoes, wait until the foliage yellows and dies back. Dump the entire container onto a tarp and dig through the soil by hand to collect the tubers. A productive container yields about 7 pounds of potatoes.
For in-ground potatoes, use a garden fork or spade. Start digging at the outer edge of the plant, at least 8-10 inches away from the stem, to avoid spearing the tubers. Gently lift the soil until all potatoes are exposed.
Never wash potatoes before storage. Brush off excess soil with your hands and cure them in a dark area at 45-60°F with 85-95% humidity for two weeks. This thickens the skins and heals minor cuts. After curing, store potatoes at 38-40°F in a dark, well-ventilated space away from apples and other fruits.
Storage Tips and Troubleshooting
Proper storage keeps potatoes fresh for months, while recognizing common problems early prevents crop loss. Knowing how to cure tubers and spot issues makes the difference between a harvest that lasts all winter and one that spoils quickly.
Curing and Storing Homegrown Potatoes
Freshly harvested potatoes need curing before long-term storage. This process toughens the skin and heals minor cuts from digging.
Gardeners should lay potatoes in a single layer in a dark, well-ventilated area at 50-60°F for 10-14 days. Avoid washing them before curing, as moisture promotes rot. Simply brush off excess dirt with dry hands or a soft cloth.
After curing, store potatoes in a cool, dark place between 38-40°F with moderate humidity. A basement, cellar, or unheated garage often works well. Keep them in breathable containers like paper bags, cardboard boxes, or wooden crates—never in plastic bags, which trap moisture.
Check stored potatoes every few weeks and remove any that show soft spots, sprouts, or green patches. One bad potato can spoil others nearby. Potatoes exposed to light turn green and develop solanine, a toxic compound that makes them unsafe to eat.
Storage duration varies by variety:
- Early varieties: 2-3 months
- Mid-season varieties: 3-4 months
- Late-season varieties: 5-6 months or longer
Common Issues and How to Solve Them
Green potatoes signal light exposure during growth or storage. Potatoes develop chlorophyll and solanine when exposed to sunlight, making them bitter and potentially harmful. Hilling soil properly around plants and storing tubers in complete darkness prevents this issue.
Scab appears as rough, corky patches on potato skin. This bacterial disease thrives in alkaline soil with pH above 7.0. Maintaining soil pH between 5.0-6.5 and avoiding fresh manure reduces scab occurrence.
Rotting tubers during storage usually result from harvesting too early, inadequate curing, or excess moisture. Waiting until plants die back completely, curing properly, and ensuring good air circulation during storage solves most rot problems.
Hollow heart creates a cavity in the center of large potatoes. Inconsistent watering and rapid growth cause this condition. Keeping soil moisture even throughout the growing season and choosing resistant varieties prevents hollow heart.
Small yields often stem from shallow planting, insufficient hilling, or inadequate container depth. Planting in containers at least 12-15 inches deep and adding soil around stems as plants grow increases tuber production significantly.
Frequently Asked Questions
Growing potatoes raises common questions about timing, soil preparation, planting depth, watering schedules, hilling techniques, and harvest indicators. These answers help gardeners avoid mistakes and grow healthy potato crops.
When is the best time of year to plant potatoes in different climates?
Gardeners should plant potatoes 2-4 weeks before the last spring frost in most climates. The soil temperature needs to reach at least 45°F, though 50-55°F is better for faster sprouting.
In warm climates with mild winters, gardeners can plant potatoes in late winter or early spring for a spring harvest. They can also plant in late summer or early fall for a winter harvest.
Cold climate gardeners should wait until early to mid-spring when the ground can be worked. Planting too early in cold, wet soil causes seed potatoes to rot before they sprout.
What type of soil mix produces the highest potato yields, and how should it be prepared?
Potatoes grow best in loose, well-draining soil with a pH between 5.0 and 6.5. The soil should contain organic matter like compost but not so much that it becomes heavy and water-logged.
For container growing, gardeners should use a quality soilless potting mix rather than garden soil. They can add a balanced vegetable fertilizer to the mix before planting since potatoes are heavy feeders.
Garden soil should be loosened to at least 8-10 inches deep before planting. Mixing in 2-3 inches of compost improves drainage and adds nutrients without making the soil too dense.
How deep should seed potatoes be planted, and what spacing is recommended for strong growth?
Seed potatoes should be planted 2-3 inches deep in both garden beds and containers. Planting deeper than 4 inches delays sprouting and can reduce yields.
In garden rows, seed potatoes need 10-12 inches of space between plants. Rows should be spaced 24-36 inches apart to allow room for hilling and plant growth.
Container-grown potatoes need at least 12 inches of width per plant. A 5-gallon bucket can hold one plant, but larger containers of 10-15 gallons produce better yields.
How often should potatoes be watered to prevent rot while supporting tuber development?
Potatoes need consistent moisture but not soggy soil. Gardeners should water when the top 1-2 inches of soil feels dry to the touch.
During the early growth stage, less water is needed since the seed potato provides moisture for the first sprouts. Overwatering at this stage causes rot.
When plants are actively growing and flowering, they need about 1-2 inches of water per week. Container-grown potatoes dry out faster than in-ground plants and may need water every 2-3 days during hot weather.
When and how should potatoes be hilled, and is hilling necessary in containers?
Hilling should begin when potato plants reach 6-8 inches tall. Gardeners mound soil or straw around the base of the stems, leaving the top 3-4 inches of foliage exposed.
The process should be repeated every 2-3 weeks as plants continue to grow. Hilling prevents potatoes near the surface from turning green and creates more space for tubers to develop.
Container-grown potatoes also benefit from hilling. Gardeners add more potting mix or straw to cover the lower stems as the plants grow taller, using the same technique as in-ground planting.
How can you tell when potatoes are ready to harvest, and what is the best way to cure and store them?
Potatoes are ready to harvest when the plant's foliage dies back naturally and turns brown. This happens when the plant reaches maturity, which ranges from 50-100 days depending on the variety.
For fresh eating, gardeners can harvest small "new potatoes" 2-3 weeks after the plants finish flowering. The skins will be thin and the potatoes will not store well.
After digging, potatoes should dry in a protected location out of direct sunlight for 1-2 weeks. This curing process toughens the skin and heals minor cuts.
Cured potatoes store best unwashed in a cool, dark place at 40-50°F with good ventilation. They should be brushed clean of excess dirt but not washed until ready to cook.